
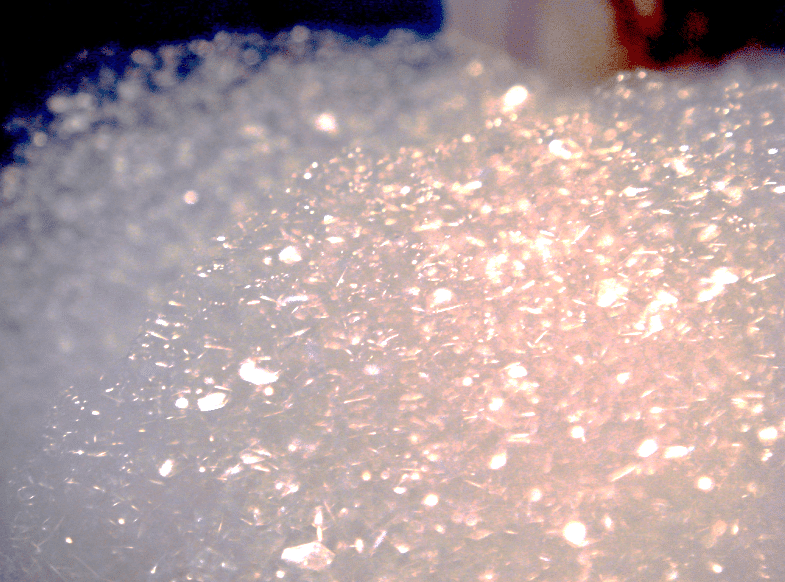
Foam in a lubricated system can be a real problem. That is because foam is a poor lubricant and can cause significant wear within a lubricated system if the lubricant film is replaced with foam. However, most foam people talk about in lubricated systems is cosmetic foam. This is foam that can spill over the side of machines during operation and although there is a slip hazard from the oil spilling over, most of this foam never reaches the parts of the system where it could cause damage. This is because the foam reaches the surface of the lubricant storage tank and eventually the bubbles burst and the foam collapses before the oil is recirculated. That is why the early oil foaming methods tend to talk about tendency to foam and stable foam, with the stable foam being the biggest concern as it doesn’t easily collapse and can be recirculated. The goal with foam testing being to try and replicate how the lubricant will interact in the machinery and generate foam.
The ideal situation would be to test with the actual machine type the lubricant will be used in, but this type of testing is not really practical and would be exceptionally costly to perform routinely that no condition monitoring lab would be set-up for. This type of testing is done by additive and lubricant manufacturers for specialist lubricant testing, but for every day condition monitoring of lubricants it would be overkill. Hence foam characteristics testing has always tried to make a laboratory equivalent of the conditions a lubricant could foam under. To explain further it might help to explain how most laboratories test for foaming characteristics of lubricants.
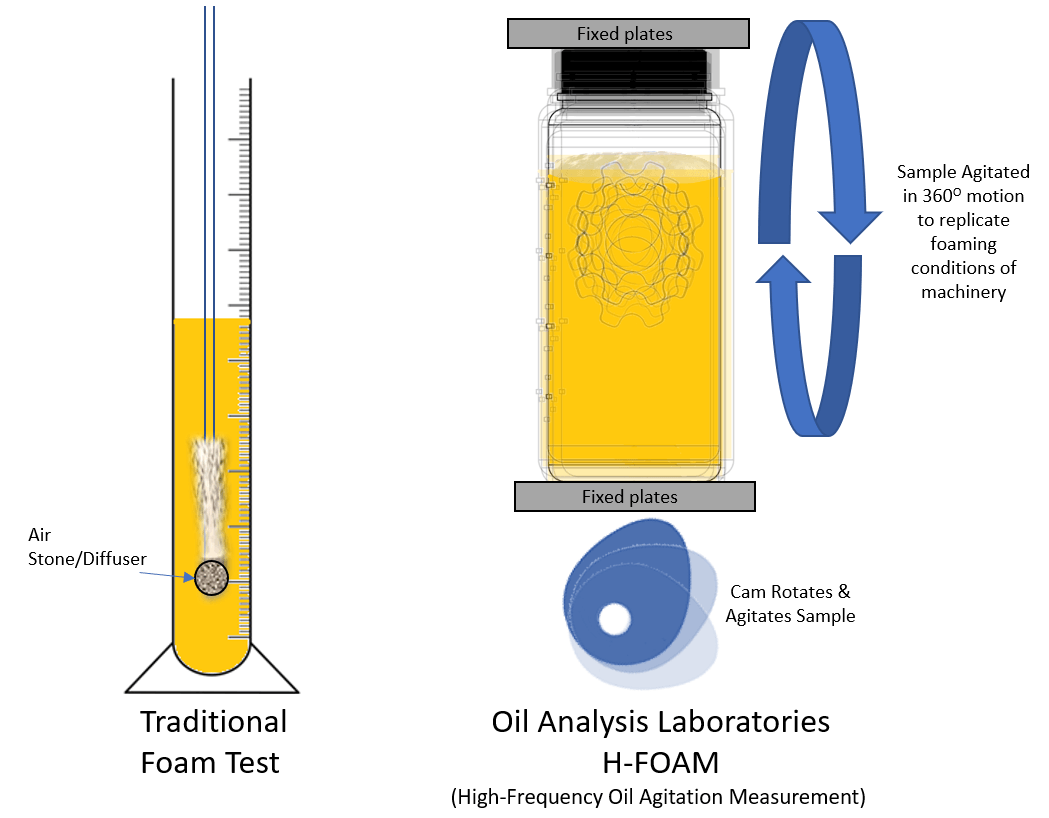
Traditional foaming analysis
To learn more about traditional foaming testing visit our specific page on this test
The traditional foam testing analysis has always focused on the air entrainment itself rather than the agitation that causes the air to become trapped in the oil in the first place.
Perhaps this is because the simplest early laboratory setups it was easier to introduce air to generate foam than try to simulate the conditions the lubricant actually encounters. The basic principle of the traditional foaming testing is introduction of air through a gas diffuser stone – similar to the air stones used in an aquarium to generate bubbles, but just scaled up to be able to handle industrial lubricants. This certainly does generate a lot of foam and is quite effective at doing so. The differing sequences often referred to as Foam I, Foam II and Foam III refer to the length of time, pre-processing before testing, number of times the test is repeated and the operating conditions during testing such as temperature used (see below for details of the testing). Most people tend to use Foam I when wanting to assess the foaming properties of an oil and it is often quoted on new oil product data sheets. The basic principle of the test is 190ml* of oil is decanted into a 1000ml cylinder and an air stone is submerged in it for 5 minutes at room temperature. The amount of foam is measured in ml at the end of the test and 10 minutes after settling.
*Don’t ask why the awkward number and these type of things tend to plague old methods where the original person performing the research performed the test a certain way. Then to replicate and confirm the findings others did the same and eventually it becomes the official way of doing things.
- Sequence 1 (ASTM D892) –Air is pumped through the stone into the oil for 5 minutes at 24’C
- Sequence 2 (ASTM D892) –Air is pumped through the stone into the oil for 5 minutes at 93.5’C
- Sequence 3 (ASTM D892) – Perform sequence 2 first and then sequence 1.
- Sequence 4 (ASTM D6082) – This is a different method to standard foaming 3 sequences and is specific for engine and transmission oils. The analysis is performed at 150’C.
The result obtained on each sequence is quoted in millilitres of foam at the end of the test called the tendency to foam. Some of this foam will then collapse over time and is measured again at 10 minutes. This foam still preset at 10 min is called stable foam. The result is expressed in tendency/stable e.g. 30/0 where there is 30ml of tendency to foam, but it had all collapsed before 10 minutes (0) leaving no stable foam.
Diagnostic significance: Additives such as detergent in the oil clean oxidation and sooty deposits, whilst anti-foam additives (typically silicone oil based) collapse foam bubbles. Imbalance in these additives can lead to foaming in a system. Stable foam is worse than foam tendency as it does not quickly collapse and enter loaded areas causing metal to metal contact and wear. Foam in general can cause leakage of oil from the surface by increasing the volume in the system and it is possible to have systems overflow with foam filling an entire room.
Typical Limits used for the traditional ASTM D892 methods: New oils typically have limits of <50ml tendency and 0ml stable foam, whilst in use applications tend to allow higher tendency up to 450ml and up to 10ml of stable foam.
A new alternative
As of writing the established ASTM and equivalent methods say the sample must not be mechanically shaken or stirred before testing which not only sounds wrong to James Bond fans, but seems in absolute diametric opposition to how foam is actually generated in machinery and hence not a true likeness to real world conditions. Unwanted foaming in machinery is generated by the agitation of the fluid through the system with air forming bubbles throughout the fluid causing a foam rather than via a stationary fluid with air being pumped through it. Hence, the established methods seem to not truly replicate real world conditions as mentioned in the previous paragraphs, but are still seen as the gold standard methods for testing for foam. This does not mean though that there are not alternative ways to test how a lubricant foams. Namely, a new technique by Oil Analysis Laboratories termed OAL High Frequency Oil Agitation Measurement or H-FOAM for short. It is intended to be an alternative to the Foam sequence I test that is the most commonly used foaming test.
How the Oil Analysis Laboratories H-FOAM test works
The sample is clamped between two plates that move by the action of a rotating cam causing the sample container contents to be agitated thousands of times per minute. The rig is designed to not only give up and down movement, but a full circular 360 degree motion (see image below). The goal being to more closely replicate the circular turbulent motion that occurs within a lubricated system at e.g. bearings, pumps and changing pipework diameters compared to traditional air introduction methods.
The conditions like in Foam I are still at room temperature, and the tendency and stable foam are still measured at the end of the test and at 10 minutes after the test. The difference being the values are measured as a percentage of the volume used rather than absolute number of ml. This means the test can be performed on smaller oil sample volumes and rather than having to purchase larger bottles or use more volume of sample from machinery to be able to perform the test. 2.6% foam would be an equivalent of 5ml in 190ml of the Foam I test (5 in 190 = 2.6%)
Benefits of the new method for foam.
Arguably, the conditions of the H-FOAM test more closely replicate the conditions under which foam would be generated as unless there is a serious air leak in a system, foam is not generated by air being actively pumped into the lubricant. Instead it is generated by the turbulence of the fluid within the system in the presence of air. It works on smaller volumes and so can be performed routinely rather than as an occasional once a year type test.
So now that foaming has been explained, there is no point in being able to identify problems unless it can be acted upon, so now it is useful to discuss foaming problems and corrective actions.
Foaming Issues – Identify the Cause
Any circulating or excessive cosmetic foam should be addressed at the first available opportunity by sending a sample of the lubricant to a suitable laboratory to measure the extent of foaming. This will identify the level of tendency to form foam and the stability of the foam once produced.
Tendency of foaming is a measure the amount of foam the lubricant is likely to produce in service if agitated with air. The Foam in this test is likely to and should collapse quickly once the agitation stops. Unless there is an excessive level of tendency to Foam then there should be no observable cosmetic foam problems. Generally, if there is a cosmetic foam issue, the oil supplier may be able to provide an anti-foam additive solution to the problem.
Stable foam – Stable foam is very serious and unless the lubricant is designed for special applications, even with high detergents lubricants, there should never be any stable foam in a system.
If observing high Foaming characteristics, the first step is it is essential for the operator to send a unused reference sample from an IBC or new oil barrel to identify if the cause is contamination or the lubricant itself. All reputable lubricant brands will have undergone years of test-bed testing to confirm that the new lubricants provide the best lubrication properties to components before going on sale, so the likelihood is the cause will be contamination, but in detective type investigations it is important to never assume.
Note the laboratory may ask for samples of potential contaminants or products on site, which can be discussed by telephone or indeed agree to a site visit to help resolve the problem.
If on the other hand, the value of foam comes out considerably higher than expected, then the next step should be to take a second sample to rule out bad sampling of the IBC or barrel. The laboratory can give advice on best practice for sampling to assist the operator if required. Confirmation of high Foam tendency and/or stability should be reported to the lubricant supplier, which will of course wish to carry out further tests and potentially all the ASTM foam sequences rather than screening Foam I or H-FOAM tests.
Foaming Issues – Correcting
Depending on the cause of the foaming the issue may be solvable by filtration to remove contaminants. However, sometimes the issue may be mixing incompatible oil; then the solution could be a full drain, flush and fluid change to remove the contamination, which can be expensive and of course the last resort.
Ideally it may be just the addition of an anti-foam additive to the system help reduce the problem, but under no circumstances should this be done without first consulting the lubricant manufacturer. Over-dosing with anti-foam can exasperate the problem of lead to to other issues such as air release issues, which can cause more problems than small amounts of cosmetic foam.
In some cases low level cosmetic foam with a slightly raised tendency, but no stable foam may be something the machinery operator chooses to live with and just closely monitors the machine system for wear. To help with this choice, it is recommended the operator submits oil filters regularly for wear debris analysis to confirm the foam is not leading to any abnormal wear processes within the system.