Pre-register samples for already created machines/assets (create sample labels step 2 of 2)
How to pre-register a sample?
Have you skipped ahead and need to learn how to add sample points first? Return to the Pre-reg overview if you need to learn how to add new sample points first.
So, you have opened your oil sample kit and realised there is no sample form and have been directed here to find out how to submit samples. The first step is to request a login. Click the contact button at the bottom corner of this screen to request one if you don’t already have one. Note this is different to a purchasing login.
Assuming you have a login, you need to have created your machine(s) in the portal. If you haven’t already done this and this is the first time this machine has been sampled with us then follow the how to add new assets to LubeWear.com tutorial first.
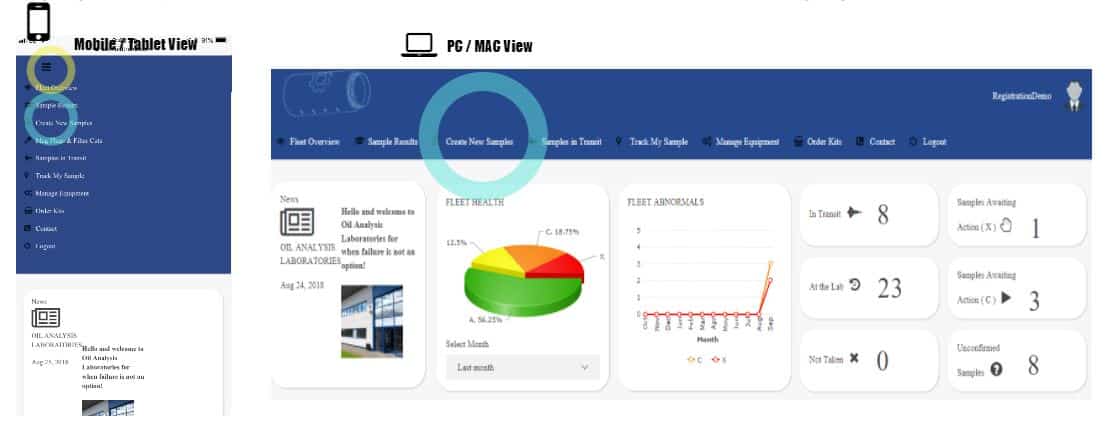
Create New Samples
Click here to log in to pre-register samples
- Once logged in navigate to the Create New Samples (ringed pale blue) menu option. On mobile devices, you may have to click the 3 horizontal line menu icon (ringed yellow) first to bring up the menu.
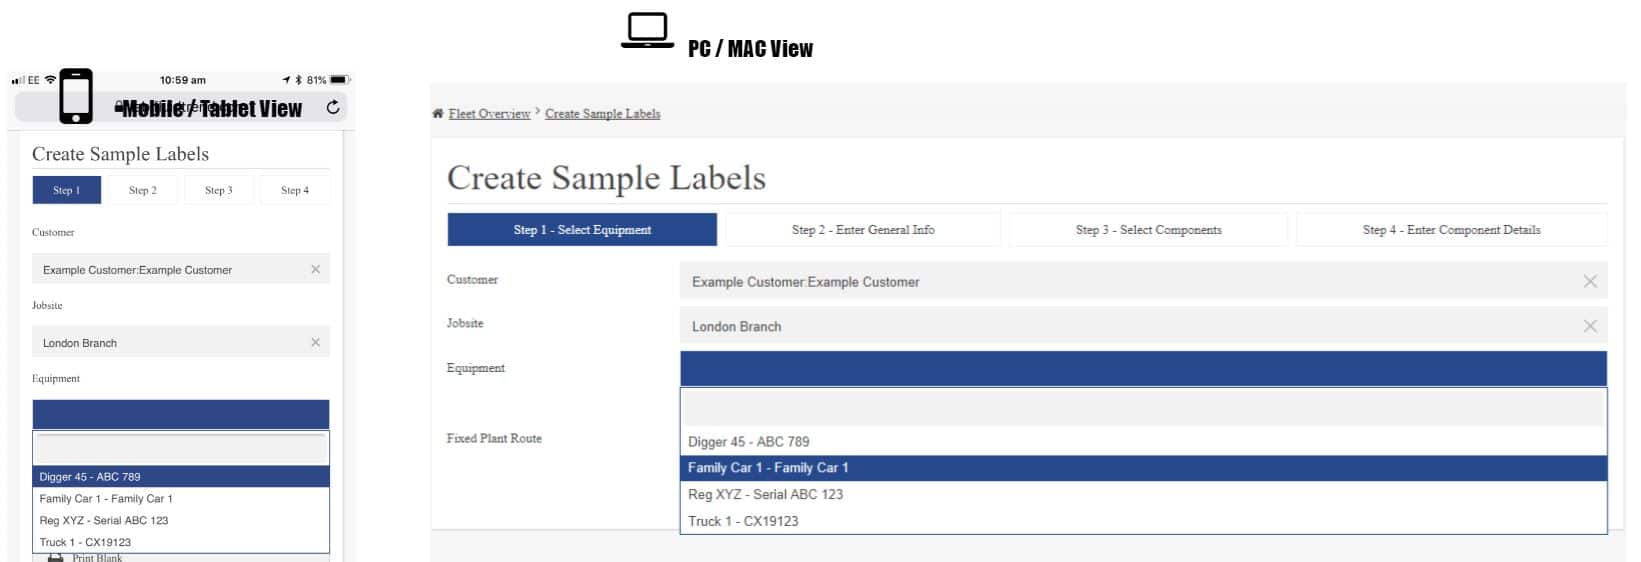
Step 1 of 5
The screen will look like below. Select the customer, then site of the customer and finally the equipment of that site in the dropdown boxes. Note the customer is who purchased the sample kit, so if you buy from a third party such as your oil or filtration supplier their name may appear as customer and you will have to pick yourself from the job site list. If you have lots of options, you can start typing above the menu box to narrow down the options. I get a lot of questions about the 4th box, but for now lets say you can always ignore the 4th box (fixed plant route). There is a little “or” between the top 3 boxes and the 4th box if you notice. Once you have selected the dropdowns click the “Next” button at the bottom of the screen (on smaller screens you may need to scroll down a bit).
Tip1: to avoid scrolling, use the combination of keys on your keyboard of “control” and “+” or “control” and “-” to resize the browser to get everything you need to use on the one screen rather than scrolling. For Mac users use the command key instead of control.
Tip2: to delete a mistake in the drop downs you need to click the grey X on the right edge of the box to clear the entries on the form.
Step 2 of 5
This looks quite daunting but none of the information is mandatory and most people simply press next anyway.
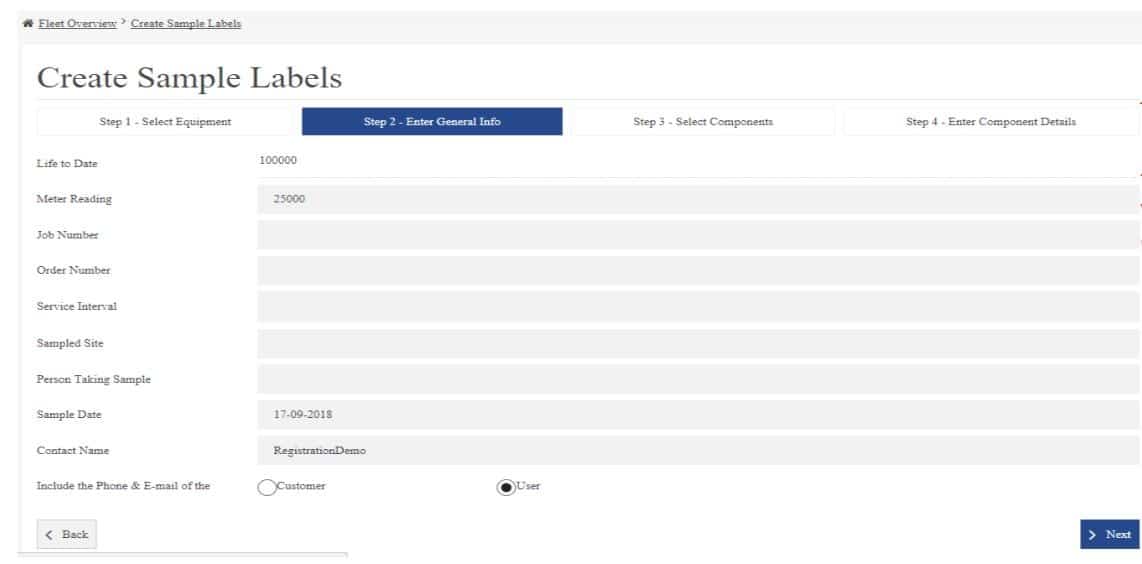
Meter reading.
If you know the machine hours or mileage type this in the meter reading field. You can only type numbers and no decimals, commas or spaces. The life to date field above shows you what the previous sample value was for the meter reading if you have sampled this machine before. If you don’t know the hours just leave as the default 0 (zero).
Job number
We don’t actually need this information to diagnose your samples, but a lot of customers like to have the information on the reports to link to their servicing jobs. If you want it to appear on the report feel free to fill in. Otherwise you can leave blank.
Sampled site
This allows you for this sample to temporarily overwrite the job site that appears on the report. Perhaps your customer has a different site or zone of the site you want to list. If you leave blank it will default to the job site on step 1.
You can leave everything else as the default and press next.
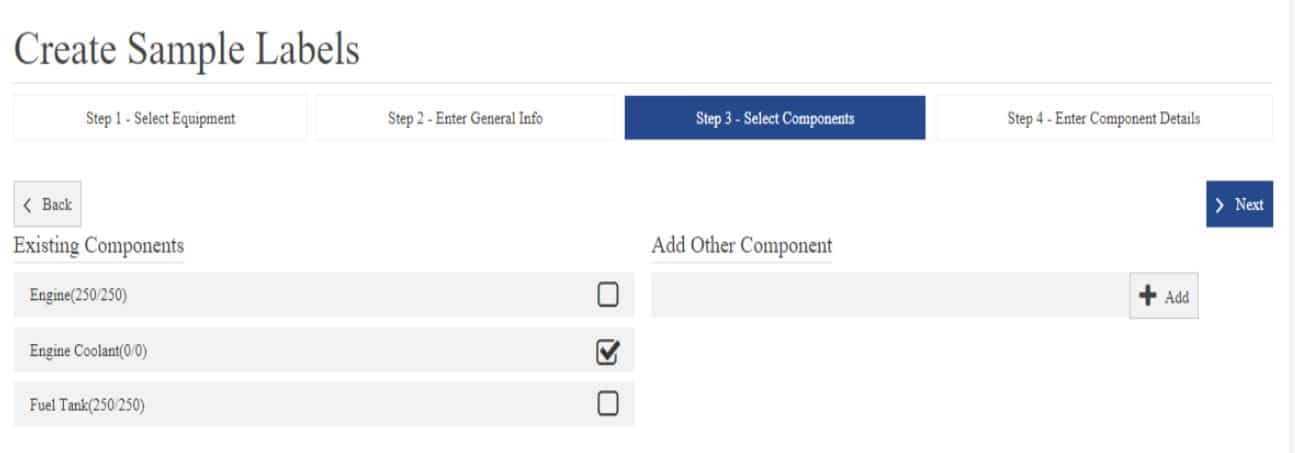
Step 3 of 5
If you have sampled a machine that only has 1 sample point it will be ticked for you and you can just press next once the screen loads. Otherwise for machines with multiple sample points like a vehicle then tick one or more you are sampling for the machine. Then hit next.
Note: There is the option to add additional components, but we would recommend against using this feature as we have carefully selected the list of available components for you already. For instance if you have a gearbox and a hydraulic we recommend creating as separate machines of gearbox and hydraulic with unique identifiers to avoid confusion of creating a gearbox additional component on a hydraulic. Hence please do not use this add component feature without contacting the lab first.
Step 4 of 5
This is where you type the information specific to the sample is entered.
Oil Type and Oil Grade
These are not free text fields and just have the list of the most popular used products by our customers. For coolants leave as generic engine coolant. For Adblue leave as default too. For fuels pick diesel or petrol and the relevant grade of fuel (EN590 for road diesel, BS2868 for red diesel etc) if not automatically selected for you.
For oils it’s the viscosity grade that is most helpful to us. Hence if you can provide the grade that is very helpful even if leaving the oil type as “other”.
If your brand of oil is not in the oil type list you can leave as other and choose the grade. Then type in the notes box the oil information and if that is a popular oil we will add to the pick list.
Your choice will be saved as default for the next time you sample this machine.
Tip: if you can’t change the grade or oil type, click the grey x in the box to clear the contents. If nothing appears when you choose the drop downs go back (use the back button on the steps on your page – not on your browser navigation bar) to step 2 and then 3. Check there is no spinning or loading icon. When finished loading, Count to 10 before pressing next to get to step 4 as this is when your internet connection is downloading the list of brands and grade combinations and pressing next too quick for your internet speed can leave the brand and grade options blank.
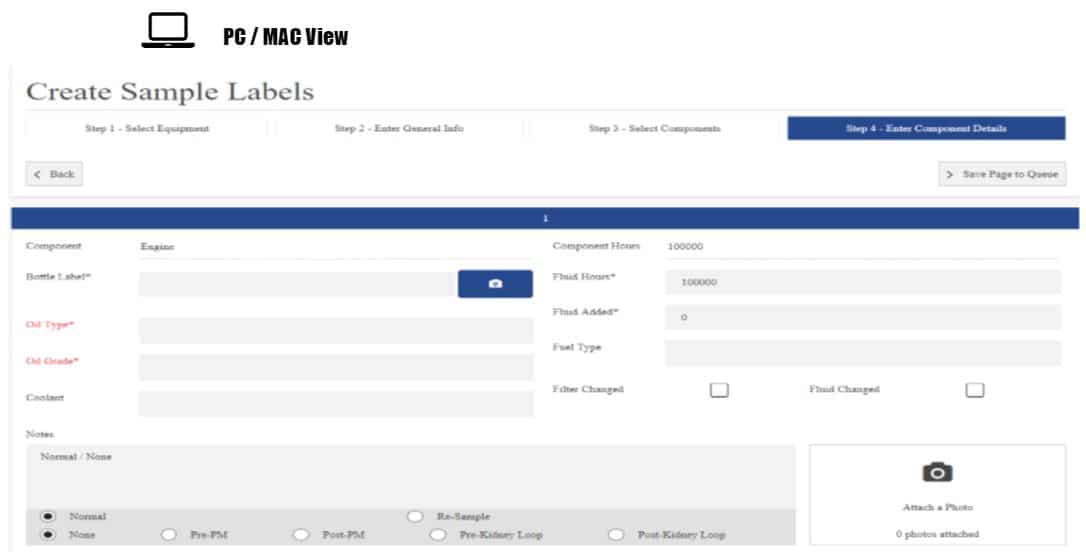
Fluid hours
This is the amount of hours or miles the oil has done. It will default to the same as the meter reading value until you change it. This must be a whole number and contain no decimals, spaces, commas or letters. If you don’t know leave as the default value.
Fluid added
This is the amount of oil added since the last sample in litres. This must be a whole number and contain no decimals, spaces, commas or letters. If you don’t know leave as the default value.
Filter and fluid change tick boxes
This is to indicate you have changed oils and filters at the service intervention when you took this sample. Tick each as appropriate.
Notes
We will assume the sample is a routine condition monitoring sample, but if there is a specific reason for sending the sample such as the oil level is rising or filters are blocking etc then write these details in the notes box. You can also add additional information about the oil type if it is not in the pick list. This information will show to the diagnostician before they interpret the sample.
Add a photo.
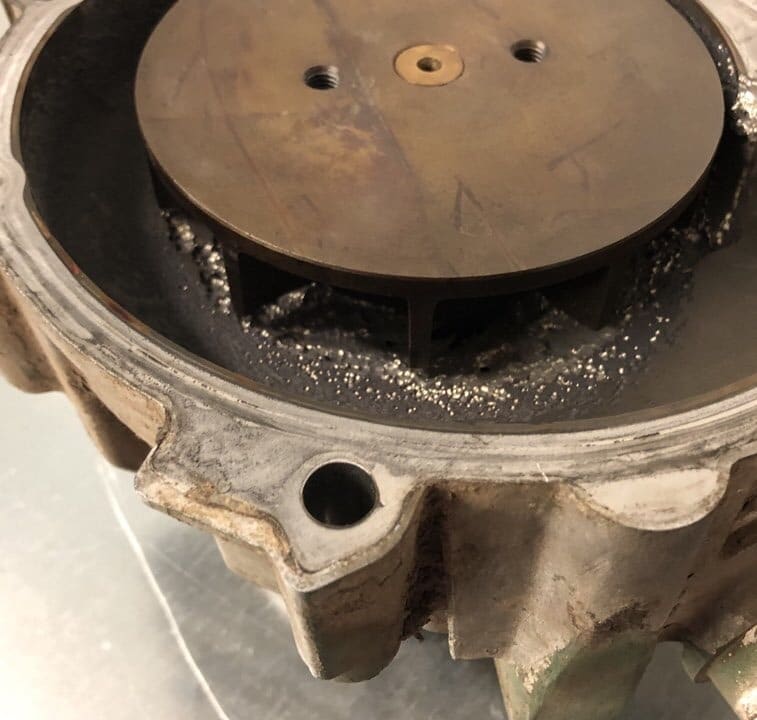
This gives you the option to add a photo that will appear on the report. Sometimes the notes box is not enough to explain the problem. An example is this water pump the customer took a photo prior to sending the coolant to investigate why the pitting had occurred. Always add a comment to the notes box to say why you have added the photo. Also, the format should be in a .jpg and the file size no greater than 1mb in size. This will cause an error when you press add to queue if you add too large a picture or the wrong format.
Bottle label.
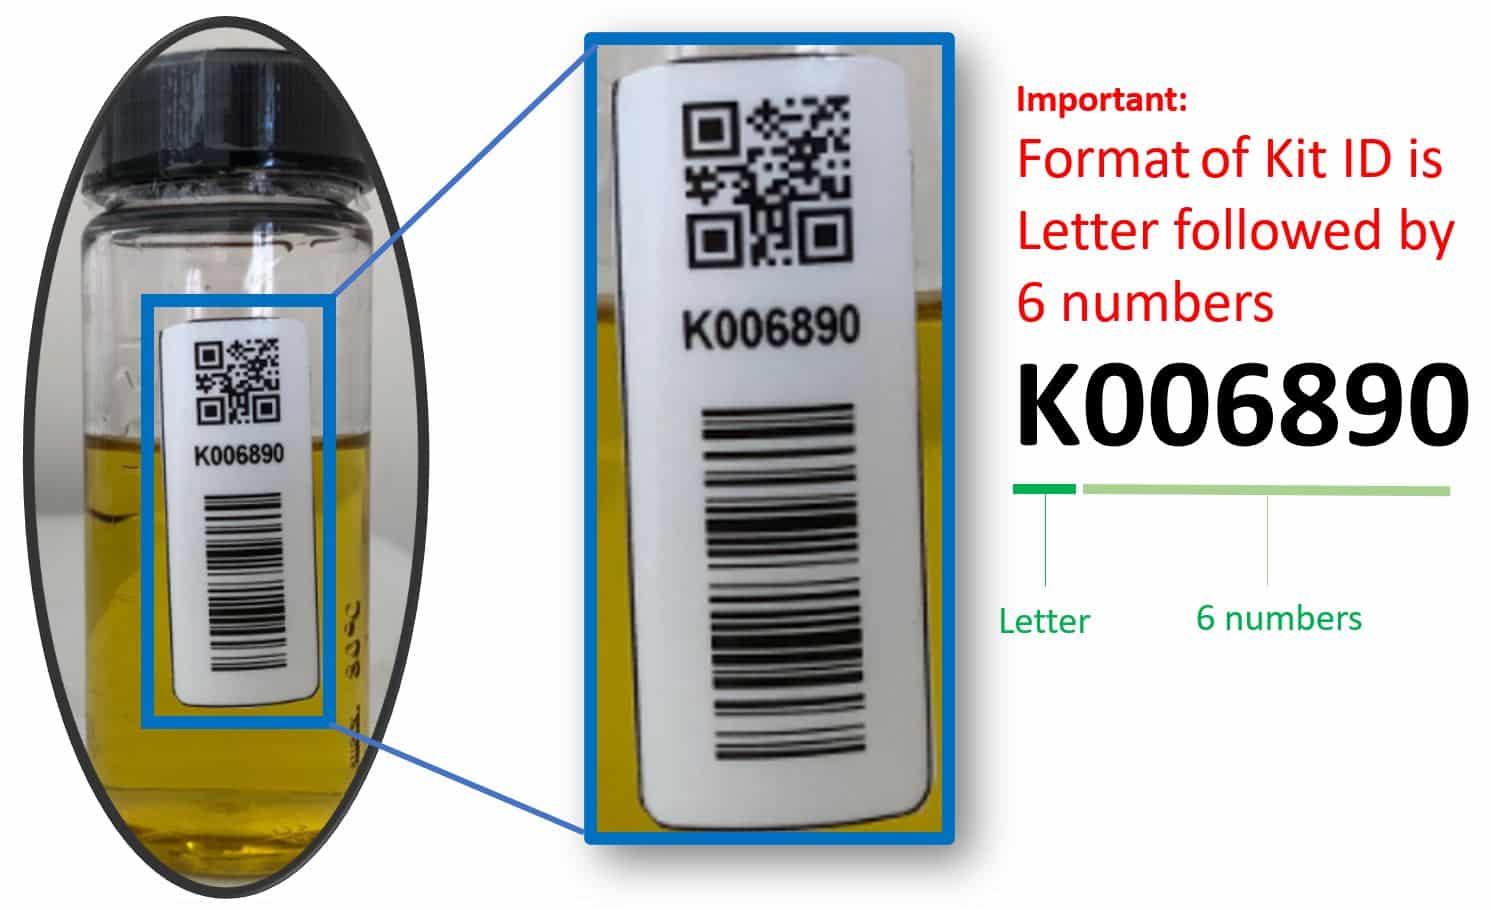
This is the K number on the bottle. It is a K followed by 6 numbers. So please type zeros rather than the letter O when entering a K number manually.
If you have our newer bottle label (purchased mid-2020 onwards) with two barcodes on you can use a webcam to scan the barcode. Note this uses the linear (supermarket style) rather than the QR (square) barcode to scan. You can watch the video on how to use this feature in the second half of the video here. If you have purchased one of our barcode scanners you can also click in the bottle label box and then scan the barcode on the bottles. This will also click the add to queue button for you immediately after scanning.
Coolant type and fluid type
You can leave these options blank as all the other information provided has given us the information we require to interpret.
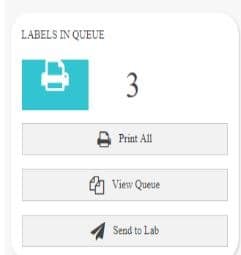
Add to Queue or Save page to Queue
If you have one of our barcode scanners this button is pressed for you when you scan the bottle barcode. Hence on barcode scanning users make sure you check everything else is right before scanning the barcode. Otherwise please confirm the details and add to queue for each label or save page to queue to add multiple labels to the queue.
Troubleshooting.
If you get a bottle already exists this can mean one of:
- You or a colleague have already used the barcode or the barcode is in somebody’s queue. Check you have not already scanned this bottle. A good tip is to move the bottle to the opposite side of the desk once scanned or I like to turn the bottle upside down once scanned (make sure you have sealed the lid properly first).
- If you have not already used the barcode the next reason is the error is because you typed an illegal character in a number field. Common ones are people typing decimals in meter reading or fluid hours, or putting the units as l for litres in the fluid added box. Please correct these and then try again.
- You have uploaded a picture not in a .jpg format or >1mb in size. Please upload in the correct format and size and it will work.
Step 5 of 5: Confirm and send to lab
After you have added your sample to the queue it will bring you back to the step 1 ready for the next sample and you will notice the labels in queue number has increased. To clear any of the entries to pick another machine to register, start from box 3 in reverse order and click the x button (grey) to the right of the box to choose a new machine at that site. You can also clear the job site box to pick a new site too. Repeat steps 1 to 4 until you have your desired samples in the queue. In this example, 3 samples. If you make a mistake you can click view queue and delete the mistaken entry.
Otherwise when ready press send to lab. The queue will return to zero and a green message box will appear confirming the successful submission of the samples. You just need to post them now.

Troubleshooting. “Send to lab” button won’t respond. This usually means you have had your internet connection drop during submitting a sample meaning the sample corrupted. Click view queue and use the print print label function for each sample to submit all the other samples in queue leaving behind the problem sample. The problem sample will be the one that doesn’t respond to the print button. So skip that and print all the others one by one. You can for your records print off the labels that appear, but they are not needed for the lab as we have the electronic record you submitted. Delete the problem sample and pre-register that one again. If still having problems click the contact us button below.