In Transit - Sample has been created by create samples page by the customer and sample should be on transit to the laboratory if courier has been organised.
Registration Failed - Indicates an error in some of the pre-reg data provided. The lab will resolve this for you.
Broken/Insufficient - Indicates the package arrived damage on arrival or had insufficient sample to complete the majority of tests required.
Not Registered - indicates a sample bottle that has been sold to you has come back to the lab with missing sample information. It is awaiting you pressing the pencil edit button and completing the registration information before testing can commence.
Registered - Sample has only just arrived, is in our sample reception currently and tests are being scheduled.
Being Tested - Sample is being tested currently but not all tests have been completed at this point.
All Data In - The last piece of data has been entered and is now being passed to the diagnostician.
This will go to Quality Assurance briefly before going to being diagnosed. This is just a normal check to make sure the data makes sense before passing to the diagnostician and is part of our ISO quality processes.
Being Diagnosed - The diagnostician is actively reviewing the lab data. This also is a quality control process and so the data can go for retesting back to being tested during this period.
Awaiting Publish - The sample has been completed by the lab, but your company / sample supplier separate to the lab wishes to release the reports to the end users manually or add their own comments to the findings. The laboratory cannot publish the samples. You would need to contact whoever you speak to who releases reports for you.
Complete - Complete means the report is complete and ready to view.
Actioned By Client - This indicates the report has been confirmed by the end customer and can be filtered as already read later. This is similar to unread and read in your email inbox with complete being unread and actioned by client being read.
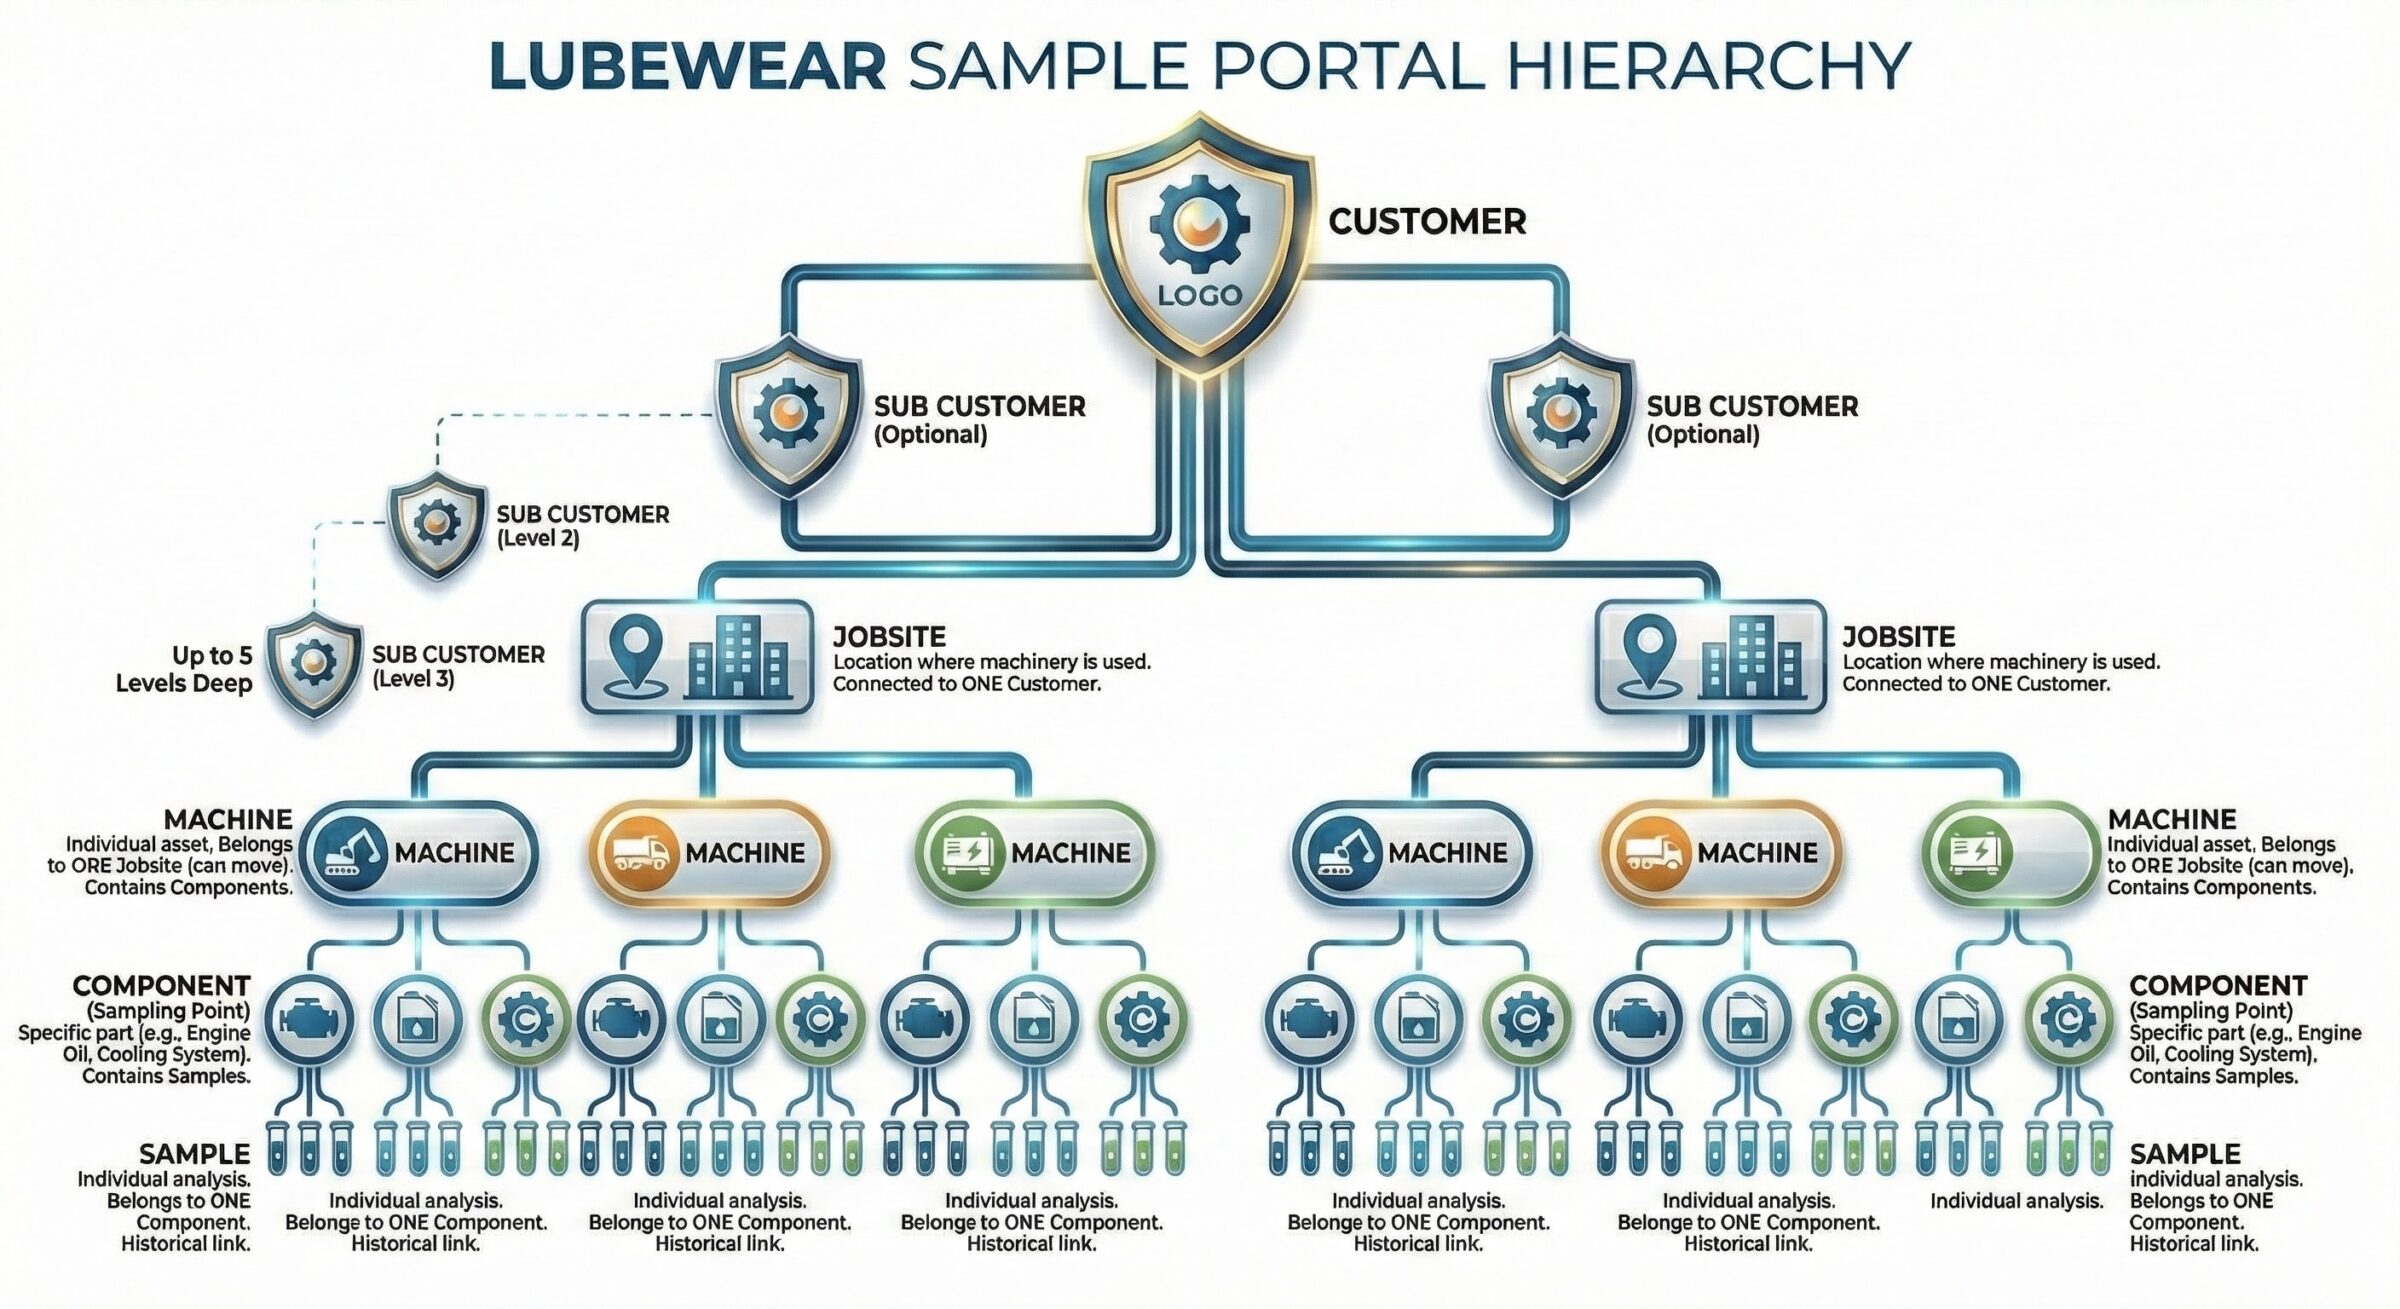
Customers. These can have their own branding and logo on the report.
Sub Customers (optional) - Most people will only ever have access to one customer, but you can create sub customers for regions e.g. if you operate in different geographical areas and want to split the data accordingly. These can go up to 5 levels deep so you can have customers of customers of customers setup if you like. This is usually a feature for clients who bundle analysis from the lab into their own services e.g. lube suppliers.
Jobsite - a jobsite is the location where the machinery is used. It can only be connected to one customer but can have many machines attached connected to it.
Machine - A machine is as it sounds an individual asset such as a car, truck, generator, digger etc. A machine can only ever belong to one jobsite, but you can move a machine from one jobsite to another.
Components - A component is a component or sampling point. So a car would have an engine oil, fuel tank, cooling system etc.
Samples - A sample belongs to a component (sample point) - you can link historical samples to an engine oil for a specific machine over time. Each component can have many samples.
An example setup for a simple customer would be:
Joe Bloggs Cars has 3 sites in London, Glasgow and Cardiff. The Glasgow dealer has 20 hire cars, 1 hire car has an engine, fuel and cooling systems. The fuel system has 4 samples taken from january to december.
00:00: This tutorial explains how to locate and manage samples using the LubeWear.com sample portal.
00:07: You will learn to navigate the samples screen and perform key actions to handle sample data effectively.
00:14: Click the Samples section to access the sample listings on the portal.
00:19: If you can’t see the menu click the hamburger 3 horizontal lines button to show the menu
00:25: Click Samples again to ensure you are viewing the main samples page.
00:30: If for any reason you can see the menu,
00:32: but can’t see samples or the samples sub menu it could be because you don’t have permission to access.
00:39: In this case please contact your sample kit supplier to request access to view and track samples.
00:46: All samples, whether they are in transit to the lab, are being tested or are complete and ready to view will all be found in the samples area.
00:54: This is your go to place and where most customers will spend their time on the portal.
00:59: So lets familiarise ourselves with the screen.
01:04: At the top of the screen you will find several search Fields you can use.
01:09: Some Fields have limited options like status which is the status of the sample.
01:14: A sample can be in transit.
01:16: Which means it is on the way to the lab?
01:19: It can be registered and then being tested meaning the lab have received in our working on it.
01:24: It then goes to being diagnosed and finally complete where the report is ready to view.
01:30: The evaluations are a phenomenal A green colour.
01:33: B for caution coloured yellow
01:36: C for serious coloured Orange
01:39: and X for critical
01:40: coloured red
01:42: we also have a certificate of analysis evaluation.
01:45: Which is for specialist non-standard projects for clients that are more nuanced and common in many legal.
01:51: insurance
01:52: warranty or post failure analyses
01:55: for the most part you will use a b c and X though.
01:59: The rest of the fields you generally need to type to begin searching as there could be millions of options to pick from.
02:07: So lets say we want to narrow our demo customer to the HF Landfill site.
02:12: If i type HF in job site it begins to narrow down straight away
02:17: As soon as i start typing the dropdown has narrowed for me, which i can select the site now.
02:24: I can combine searches so as well as selecting HF landfill. I can also pick a status of being tested.
02:30: So I can check if any samples are currently being tested for that site now.
02:36: The dropdown lets me pick being tested
02:40: I can be clever and sofa instance pick registered being tested and being diagnosed which would find anything currently the lab are working on.
02:48: In this case at the bottom in red, I can see no samples are available for this search criteria.
02:54: So I can remove the status with The X symbol.
02:58: I can change the criteria to just show me samples that are complete and ready to view
03:04: I can now click an evaluation letter next to a sample and open up the sample information.
03:11: A window appears on screen and contains the sample information,
03:15: the current sample diagnosis and current sample data and diagnosis.
03:20: The top sample highlighted in grey is the current sample and historical samples are beneath.
03:27: I can jump to a historical sample by clicking a lab number which all start O A L.
03:33: The confirm button on the screen changes the sample status from complete to actioned by client.
03:40: This is basically marking you have read and actioned or are actioning the sample.
03:45: To close a window click the x or simply click on the screen behind the window which closes the current window too
03:53: If we filter status on Actioned By Client to indicate the sample has been processed by the client.
04:01: We can see our sample has been actioned and allows us to come back to it later.
04:06: Lets click the C evaluation to open the window again
04:10: Your exact view in this area will vary depending on your permissions,
04:14: but essentially you will have a default download option for download the pdf report,
04:19: but you will also have additional report options depending on your access.
04:25: For example if you want to see the limits and baseline reference samples used,
04:29: you can download a baseline version of the report
04:33: Again we can dismiss the window, rather than clicking the x button i can simply click off screen to dismiss the screen.
04:41: Its totally up to you which you prefer to close the current window.
04:46: Now the default filter is the last 12 months.
04:50: This video is being recorded in 2026
04:53: – hello from the past by the
04:55: way, so if i had a sample i was looking for from 2024 this is over a year ago.
05:00: I can change the date range to other options such as last 7 days,
05:05: last month,
05:05: last quarter etc,
05:07: but if you want a custom one, click Custom
05:11: Once we have selected custom we can pick a custom date range.
05:16: Enter the custom date range to specify the period for sample filtering.
05:22: Click Apply to confirm and activate the date range filter on samples.
05:28: Select another sample evaluation to open.
05:32: I can see the sample information,
05:34: but notice the sample has a future button.
05:37: That means i have not got the most recent sample for that machine open,
05:41: so if i want to jump to the current status i can click that to see the most current sample all the way back to this sample.
05:49: When done click show current and historical takes you back to the view you just had open
05:55: Again close with the x or click off the window to go back.
06:00: Now let’s pretend that the diagnosis commented the additive package didn’t look right for the oil brand I selected.
06:07: In this case, I might have made a mistake when i sent off the sample that needs correcting.
06:12: I can correct any incorrect information by clicking the pencil next to the sample.
06:19: And in this can i can change the oil brand from brand 6 to brand Y.
06:24: Fill in the details for the selected oil type to update sample information.
06:30: I can confirm the grade is an SAE 40 oil again.
06:35: Click Save to store all changes made to the sample information.
06:40: Click Request Reinterpretation to ask for a review of the sample analysis by the lab.
06:47: Fill in why you want a reinterpretation.
06:51: Click SUBMIT to send your reinterpretation request for processing.
06:56: You have successfully located and managed samples on the lube.com sample portal by navigating the sample screen.
07:03: filtering results editing sample details and submitting reinterpretation request
07:10: for further assistance Explorer additional features or consult the support resources of available on the portal.